
Have you ever wanted to know how to do some of the most important steps in makeup? But just can't seem to get it right sometimes, WELL I hope this post will be informative enough to help you master how to do you blush, bronzer and highlighter!
I know that sometimes doing your blush, bronzer and highlighter can be a tricky task, from knowing which products to use and that will look good to the perfect technique and then to getting both sides to look even and matched up. Today I am going to share the products and technique I like to use when applying these product:
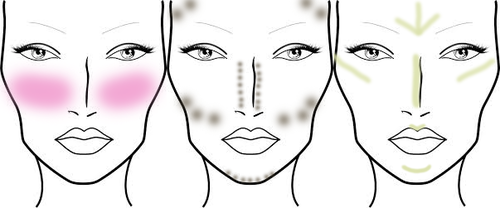
Blush:
* shown in the first face chart to the far left *
Product Used: ELF Studio Blushes ($3) or NYX Powder Blushes ($6)
Product Used: ELF Studio Blushes ($3) or NYX Powder Blushes ($6)
The
best way I have figured out to learn how to apply blush is to smile
super big, if you have dimples you will apply the blush above that to
the 'fat' part of your cheeks and stroke back to just above your ears.
This part of the face is referred to as the "Apple of the Cheeks". I also like to use the two finger rule when applying your blush place your fingers right to the side of your nose and start applying your blush on the other side of the fingers, this will give your cheeks a nice natural rosy glow.
Bronzer:
* shown in the middle face chart *
Product Used: NYX Powder Blush in Taupe ($6)
Product Used: NYX Powder Blush in Taupe ($6)
I
feel as if I'm weakest in this area, just because I'm always afraid to
play with bronzer, because I don't want to make my face appear dirty.
The technique I use is to get some on my brush and press the extra on to
my hand, then I make a fishy face and were my cheeks become hollow is
where I start to apply the bronzer. I work in those areas first pulling
the product back to my ears and slightly along the sides of my face I than take any extra product that may be left over and blend it down my face towards to corners of my mouth. Then I brush a small amount on my temples, down the sides of my nose and
finally on my jawline, just under my chin area. You can see where I
apply it better in the face chart above!
Highlight:
* shown in the face chart to the far right *
Product Used: ELF Studio Blush in Gotta Glow ($3)
Product Used: ELF Studio Blush in Gotta Glow ($3)
Highlighting
has to be my favorite part of doing my face make-up, I love the glowy
and natural affect it gives to my skin. I like to apply my highlight
right above where I applied my blush, on my cheekbones. I also like to
bring it down the bridge of my nose, slightly in the center of my
forehead, and then on my cupids bow (right above my natural lip curve)
and on my chin. I tend to focus this more on my cheekbones however
because I like my face to stand out, I also find applying to much in the
other areas can come off as looking cakey and oily, so less is more in
my case.
I hope you enjoy my little steps and products recommendations of how to do your blush, bronzer and highlighter! If you have any techniques that you like to do or products you like to use please leave them below as I always like to try new products
Did you find this post helpful? What was your favorite part?

Bloglovin' | Tumblr | Instagram | Twitter
No comments :
Post a Comment
Embrace and Ignite is a beauty blog run by Krystal-Marie which is dedicated to being the buzz-hub for the latest and greatest beauty products.
Thank you all for sharing my love of beauty and makeup and I look forward to connecting with you all in the comments section!